The very first thing you'll want to do is to create a new user on the machine you're intending to run Gerrit on. In our case, we created a user called "gerrit". Then, log into that user.
The next thing you'll have to do is download the official java package.
Download gerrit.war from the Official Gerrit page
Then enter the following command into your command line:
java -jar gerrit.war init -d path/to/site/folderNote: The "path/to/site/folder" should be a folder you don't need admin access to change (e.g. ~/gerritSite)
This will create the folder you provide in the "-d" argument and start the initialisation dialog. You can run this command again on an already existing Gerrit folder to change its configuration.
Below you can see the configuration dialog from our setup. We went with the default options in most cases (except the http port to listen on, which we set to 8081 because 8080 is already used for Jenkins. Also, we didn't install bouncy castle).
bash-3.2$ java -jar /Applications/Gerrit/gerrit-2.11.war init -d badgeme
Using secure store: com.google.gerrit.server.securestore.DefaultSecureStore

*** Gerrit Code Review 2.11
***

Create '/Users/gerrit/Documents/gerrit/badgeme' [Y/n]?

*** Git Repositories
***

Location of Git repositories   [git]:

*** SQL Database
***

Database server type           [h2]:

*** Index
***

Type                           [LUCENE/?]:

*** User Authentication
***

Authentication method          [OPENID/?]:

*** Review Labels
***

Install Verified label         [y/N]?

*** Email Delivery
***

SMTP server hostname           [localhost]:
SMTP server port               [(default)]:
SMTP encryption                [NONE/?]:
SMTP username                  :

*** Container Process
***

Run as                         [gerrit]:
Java runtime                   [/Library/Java/JavaVirtualMachines/jdk1.8.0_45.jdk/Contents/Home/jre]:
Copy gerrit-2.11.war to /Users/gerrit/Documents/gerrit/badgeme/bin/gerrit.war [Y/n]?
Copying gerrit-2.11.war to /Users/gerrit/Documents/gerrit/badgeme/bin/gerrit.war

*** SSH Daemon
***

Listen on address              [*]:
Listen on port                 [29418]:

Gerrit Code Review is not shipped with Bouncy Castle Crypto SSL v151
  If available, Gerrit can take advantage of features
  in the library, but will also function without it.
Download and install it now [Y/n]? n
Generating SSH host key ... rsa(simple)... done

*** HTTP Daemon
***

Behind reverse proxy           [y/N]?
Use SSL (https://)             [y/N]?
Listen on address              [*]:
Listen on port                 [8080]: 8081
Canonical URL                  [http://mrs.mmlab.mintern.mi.hdm-stuttgart.de:8081/]:

*** Plugins
***

Installing plugins.
Install plugin download-commands version v2.11 [y/N]?
Install plugin reviewnotes version v2.11 [y/N]?
Install plugin singleusergroup version v2.11 [y/N]?
Install plugin replication version v2.11 [y/N]?
Install plugin commit-message-length-validator version v2.11 [y/N]?
Initializing plugins.
No plugins found with init steps.

Initialized /Users/gerrit/Documents/gerrit/badgeme
Executing /Users/gerrit/Documents/gerrit/badgeme/bin/gerrit.sh start
Starting Gerrit Code Review: OK
Waiting for server on mrs.mmlab.mintern.mi.hdm-stuttgart.de:8081 ... OK
Opening http://mrs.mmlab.mintern.mi.hdm-stuttgart.de:8081/#/admin/projects/ ...OK
Now the Gerrit server should be live and available both via Server IP + specified port and with the "Canonical URL" that is shown at the end of the setup dialog.
Login
After setting up the server the next thing you'll probably want to do is open the Gerrit page and log in (at least that's the first thing we wanted to do).
Note: At this point we ran into a little problem:
We used the default setting for authentication hoping it was a simple account management. For OpenID being the default method, this was kind of true... The problem was that Google had just stopped supporting OpenID (1 week before we started the project) and switched to OAuth. Since Gerrit didn't support OAuth natively (there is a plugin but we didn't get it running as fast as we were hoping) we decided to create new accounts at one of the pages proposed by Gerrit (some chose Yahoo ID, others chose Launchpad.net).
If you have access to an LDAP-server, the easiest way for you to log in is probably using that server (you will have to do the configuration again and choose LDAP as authentication method).
Note: The account of the first person who logs in is automatically turned into admin account. The admin can distribute rights to other users.
Creating a project
In order to create a new project in Gerrit, log in with your previously created account. Then, select the "Projects" tab in the top bar and hit "Create New Project".
Next, enter a name for your project.
Note: Renaming or deleting the repository (project) is not possible in Gerrit (by default), so choose your name wisely or you will be stuck with a repository called "firstTestProject".
After that, choose the rights to inherit from:
If this is the first project you can just inherit from the default "all projects". You can also create a new project just to serve as a parent for other projects which then inherit the settings of the parent project.
Cloning the project
From the "Projects" selection in the top bar, you can see a list of all projects by clicking onto "List" below. After clicking on one of them you'll see the options page for this project.
In the project options page you can see (amongst other settings) the URL to use for cloning the Git repository like you would normally do.
Deleting projects
As mentioned earlier, deleting projects isn't possible by default (Gerrit prevents you from deleting projects because they have dependencies among themselves. Thus, deleting one project in the chain could have severe ramifications for other projects).
Note: There is a plugin that allows deleting projects, but we just deleted the whole Gerrit folder and ran the init comand again.
Git
Internally Gerrit sets up a fully functional Git repository which you can clone and push reviews to.
Each project has a unique Git URL you can see in the project options.
Note: If you want to set up a Git replica on an external server make sure that the name of the repositories match in case you want to mirror multiple repositories without specifing a destination address for each repository. We also needed to add credentials to the Gerrit config.
Permissions
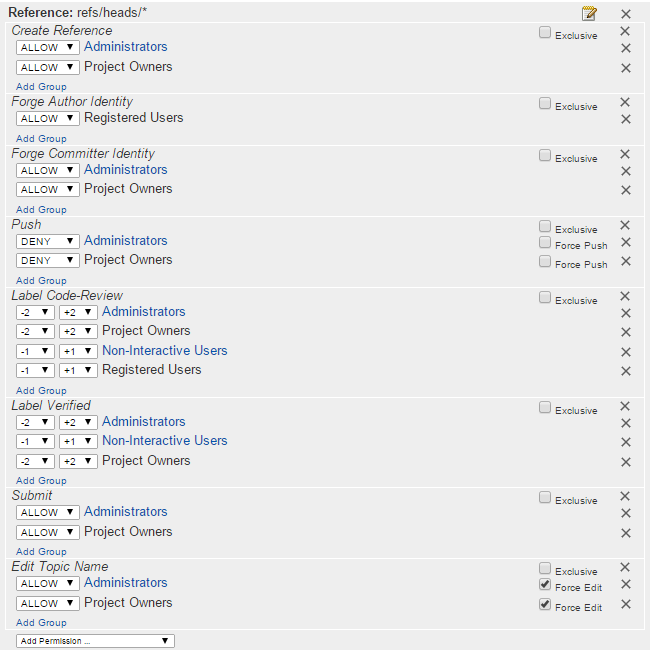
Can be set for groups, project owners, admins and registered users in "Projects" > "Access". Permissions include things like: Who is allowed to read, push or submit changes. In addition it can be defined, how much influence certain groups should have over the reviewing process. Permitted users can create projects.
You can see some of the access restrictions that we defined for our project in the screenshot below. Among the important ones are:
- Pushing is prohibited
- Patch Sets need +2 "Code-Review" and +1 "Verified" in order to pass
Pushing commits to Gerrit for reviewing
At first, install git-review on your mac
brew install git-review
Note: For installation on other operating systems see: http://www.mediawiki.org/wiki/Gerrit/git-review
Rename the remote path of your Gerrit folder to Gerrit:
Git remote rename origin gerritCreating "PatchSets" (commits that others should review)
- Make changes to your local files
- Commit your changes (Git commit ...)
- Push your changes to Gerrit with Git review
Git review [BRANCH]Note: You can also put your current working branch in the ".gitreview" file, e.g. defaultbranch=dev
The login information to push changes to Gerrit can be found in the user settings on Gerrit. You can choose between SSH and HTTP. In case of HTTP you have to generate another password under YOUR USERNAME (top right corner) > Settings > HTTP LOGIN
For more information about Git review see:
https://www.mediawiki.org/wiki/Gerrit/git-review
Gerrit and Branches
The branch to push to can be specified when submitting reviews.
Branches can be created using the Gerrit UI under Projects > List > PROJECT_NAME > Branches
If you create e.g. a dev branch and want to point it to the current revision of the branch with the name "master" just enter "master" in the revision field.